Say No to Create React App!

Before beginning our quest to find how not to use Create React App. First, let’s see why we need Create React App in the first place.
Why do we need Create React App? 🤔
Create React App is a comfortable environment for learning React and is the best way to start building new single-page applications.
Let’s see what major tasks are performed by Create React App : 😼
- A React application written in JSX or ES6 format would be able to run on browsers without any browser supporting such format.
- A React Application is written in components and a number of javascript files are used without writing any script tag and without embedding them in HTML we are able to use all of them this is handled by WebPack.
- WebPack also handles embedding many different types and formats of files in React Application.
- All of these functionalities are bundled in one and available using one script and one command.
Now having seen all these perks of Create React App, the question arises why do we need to build React Application from scratch? 😅
Why we shouldn’t use Create React App? 😜
CRA or Create React App was built for beginners to learn React without needing to configure WebPack and thus decreasing the entry barrier to create a react app on a whim.
However, this approach is not suitable for production at all. Unfortunately, CRA is being used in far more cases than it should be.
- It limits the ability to configure React applications.
- It has tons of unnecessary dependencies thus blotting the size of bundled code.
- Also, it is important to understand how React application is built from scratch for any dev so that they understand the inner configuration.
We can look at it in this way say You are a superhero ( Tu hai Tu hai tereko pata nai hai Tu hai 😜)( Remember Batman Begins if you have seen it). You need a suit at the beginning and in hurry, you would use a one-piece suit useful in an instant.
However to add functionalities you would need to add parts to add. You would need to have a lot of flexibility and movement. This is only facilitated if you build the entire suite by yourself assembling each part with inspection and usage.
Think of React Application in production through the same glasses.
Now having looked at the necessity to not use CRA suit, let’s build our own Create React App SuperHero Suit from scratch.
Step 1: 😇
Create an empty directory name it ( noCreateReactApp) just kidding name it to your choice 😜.
Open the terminal or open the folder in VS Code in the terminal initialize the package.json file using this command.
npm init -y
Package.json
It contains all the dependencies currently and automatically updates with all dependencies added to the file in the folder.
{
  "name": "nocreatereactapp",
  "version": "1.0.0",
  "description": "",
  "main": "index.js",
  "scripts": {
    "test": "echo \"Error: no test specified\" && exit 1"
  },
  "keywords": [],
  "author": "",
  "license": "ISC"
}
Add git to the project using
git init
Also, add a .gitingnore in the root directory and write node_modules in .gitignore. Because it would be a huge folder with no significance added to git without any practical use at all.
Step 2: 🤗
Folder structure for React Project. You would have noticed the public and src folders inside the root directory(”/”). We would also be making these two folders in our project.
public folder
It contains all the static images,svgs, and index.html file in which React renders the app.
You might have noticed whenever you would use an image file in anchor tags it usually is placed in the public folder and is added using a relative path with respect to the public.
In the public folder let’s add index.html
index.html
<!DOCTYPE html>
<html lang="en">
<head>
    <meta charset="UTF-8">
    <meta http-equiv="X-UA-Compatible" content="IE=edge">
    <meta name="viewport" content="width=device-width, initial-scale=1.0">
    <title>Not a Create React App</title>
</head>
<body>

    <!-- React will render our app here -->
    <div id="root"></div>
    <noscript>
        Please enable javascript to view this site.
    </noscript>
    <script src="../dist/bundle.js"></script>
</body>
</html>
Step 3: 😇
After initializing an NPM project in our folder, we should install React and React DOM.
- React is for building the React components.
- While React DOM is responsible for rendering React on the browser.
Use this command.
npm install react react-dom
Step 4: 😬
Add App.jsx or App.js to the root directory. This will provide content to the rendered page.
Alongside also make an App.css page to give styling to App.jsx.
App.jsx
import React from "react";
import "./App.css";
const App = () => {
return (
    <div>
    <h1 className="heading">Not a Create React App</h1>
    <h4 className="sub-heading">
        CSA from scratch.
    </h4>
    </div>
);
};

export default App;
App.css
/* stylings for App component */
.heading,.sub-heading{
    color:blueviolet;
    text-align: center;
}
index.jsx
import React from "react";
import ReactDOM from "react-dom";
import App from "./App";
ReactDOM.render(<App/>,document.getElementById("root"));
The current folder structure looks as such :
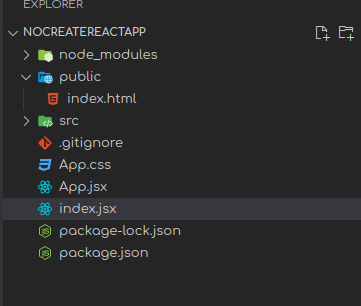
- We have node_modules for packages to be installed.
- public folder to contain static files and index.html
- src to store React components.
.gitignorefor git- App.css and App.jsx contain content to be rendered on screen.
- index.jsx binds the react app with index.html.
Now let’s modify index.html to bind with index.jsx
<!DOCTYPE html>
<html lang="en">
<head>
    <meta charset="UTF-8">
    <meta http-equiv="X-UA-Compatible" content="IE=edge">
    <meta name="viewport" content=
        "width=device-width, initial-scale=1.0">
    <title>Not a Create React App</title>
</head>
<body>

    <!-- This is the div where React
        will render our app -->
    <div id="root"></div>
    <noscript>
        Please enable javascript to view this site.
    </noscript>
    <script src="../index.jsx"></script>
</body>
</html>
<script> tag is modified to import index.jsx. In future, we will add bundle.js which would bundle all the JS files into one.
But now in order to check if the app is ready for use, we add index.jsx.
Open the HTML file in the browser
We encounter this error! 🙄

Now, what does this mean?
So here comes the important steps to add babel and WebPack to our app.
Step 5: 🧐
We write our code in modern ES6 syntax but most browsers do not support it. So, in order for our app to run on the browser, we need Babel.
There are two major functions of Babel: -
- It converts new ES6 syntaxes into browser-compatible syntaxes so that old versions of browsers can also support code.
- It also converts JSX (JavaScript XML) into vanilla javascript.
We install babel/core, babel/cli, babel/present-env, and babel/present-react using this command on the terminal.
npm install --save-dev @babel/core @babel/cli @babel/preset-env @babel/preset-react
Here,
- –save-dev means save all above-installed modules in devDependencies in package.json file,
- @babel/core is the core of the Babel compiler a module that contains the main functionality of Babel,
- @babel/cli is the package that will install the Babel CLI executable in the
node_modulesfolder. And is a module that allows us to use babel from the terminal, - @babel/preset-env is preset that handles the transformation of ES6 syntax into common javascript,
- @babel/preset-react is preset which deals with JSX and converts it into vanilla javascript.
Having installed the Babel dependencies, we shall create a Babel configuration file in the root directory. This file will tell babel transpiler what presets and plugins to use to transpile the code.
.babelrc
{
    "presets": ["@babel/preset-env","@babel/preset-react"]
}
Now to see the effects of babel on our index.jsx file we run our index.jsx using Babel compiler executable installed in our node_modules
npx babel index.jsx --out-dir lib
This command tells NPX — NPM’s in-built package runner, to run the Babel executable installed in the
node_modulesfolder. Afterbabelthere are the arguments to the Babel executable, which is the source file or directory (index.jsx) and the output file or directory (lib) prepended by the out-dir flag.
The output newly transpiled JS index.js file can be found in lib/folder of root directory.
"use strict";

var _react = _interopRequireDefault(require("react"));

var _reactDom = _interopRequireDefault(require("react-dom"));

var _App = _interopRequireDefault(require("./App"));

function _interopRequireDefault(obj) { return obj && obj.__esModule ? obj : { "default": obj }; }

_reactDom["default"].render( /*#__PURE__*/_react["default"].createElement(_App["default"], null), document.getElementById("root"));
We now again modify index.html to point it’s <script> tag to new index.js in lib folder instaed of index.jsx in root directory.
<!DOCTYPE html>
<html lang="en">
<head>
    <meta charset="UTF-8">
    <meta http-equiv="X-UA-Compatible" content="IE=edge">
    <meta name="viewport" content=
        "width=device-width, initial-scale=1.0">
    <title>Not a Create React App</title>
</head>
<body>

    <!-- This is the div where React
        will render our app -->
    <div id="root"></div>
    <noscript>
        Please enable javascript to view this site.
    </noscript>
    <script src="../lib/index.js"></script>
</body>
</html>
The console now again gives us no output. 😶
Instead we get this error in the console.

In order for our application to be understood by browser, we move to Step 6
Step 6: 😮💨
Install the WebPack.
In brief :
- The WebPack is a static module bundler that works well with babel.
- It creates a local development server for our project.
- The WebPack collects all the modules and bundles them up together in a single file or more files (static assets).
For more info on WebPack refer to my blog :
What is WebPack and What are Modules?
Now coming to code to install WebPack.
npm install --save-dev webpack webpack-cli webpack-dev-server
Here,
- –save-dev is the same as discussed above,
- webpack bundles all our files into one file it is **a modular bundler,
- webpack-cli allows us to use WebPack from the terminal by running a set of commands, “WebPack CLI provides a flexible set of commands for developers to increase speed when setting up a custom WebPack project”
- webpack-dev-server provides **a development server with live reloading i.e. no need to refresh the page manually.
Step 7: 🤪
We install loaders for WebPack as it can understand JavaScript and JSON files only. So, to use WebPack functionality in other files like .css, babel files, etc., we have to install some loaders.
npm i --save-dev style-loader css-loader babel-loader
Step 8: 🤩
Now let us create a WebPack configuration script with the following:
webpack.config.js
const path = require("path");

module.exports = {

// Entry point that indicates where
// should the webpack starts bundling
entry: "./index.jsx",
mode: "development",
module: {
    rules: [
    {
        test: /\.(js|jsx)$/, // checks for .js or .jsx files
        exclude: /(node_modules)/,
        loader: "babel-loader",
        options: { presets: ["@babel/env"] },
    },
    {
        test: /\.css$/, //checks for .css files
        use: ["style-loader", "css-loader"],
    },
    ],
},

// Options for resolving module requests
// extensions that are used
resolve: { extensions: ["*", ".js", ".jsx"] },

// Output point is where webpack should
// output the bundles and assets
output: {
    path: path.resolve(__dirname, "dist/"),
    publicPath: "/dist/",
    filename: "bundle.js",
},
};
And let’s see what all of this is doing:
entry: The entry point for our application. In React, this is the file where we use our renderer.mode: The mode in which the application is being run (development or production).output: Informing WebPack where to put our bundled code and the name of the file.module: Informing WebPack how and when to use the loaders we installed. We’re using regex to tell each loader which file extensions to target.
Step 9: 🤓
Within the script in package.json add the following commands to run and build the project.
"scripts": {
    "start":"npx webpack-dev-server --mode development --open --hot",
    "build":"npx webpack --mode production",

  }
Here,
- –open flag tells the WebPack-dev-server to open the browser instantly after the server had been started.
- –hot flag enables WebPack’s Hot Module Replacement feature. It only updates what’s changed in the code, so does not update the whole code, again and again,and it saves precious development time.
Lastly modify index.html to now point <script> to bundle.js in dist folder for output.
<!DOCTYPE html>
<html lang="en">
<head>
    <meta charset="UTF-8">
    <meta http-equiv="X-UA-Compatible" content="IE=edge">
    <meta name="viewport" content=
        "width=device-width, initial-scale=1.0">
    <title>Not a Create React App</title>
</head>
<body>

    <!-- This is the div where React
        will render our app -->
    <div id="root"></div>
    <noscript>
        Please enable javascript to view this site.
    </noscript>
    <script src="../dist/bundle.js"></script>
</body>
</html>
Onto the final step now : 😍
Step 10: 😎
npm start
And this runs the command on the terminal to run the project in development mode.
This is the hosted page.

This is the console.